• Skip to main content
  • Skip to footer

Illustrated Ministry

Illustrated Resources for the Church & Home

  • About
  • For Churches
  • For Families
  • Products
    • Complete Catalog
    • Advent
      • An Illustrated Advent for Families: Now in Flesh Appearing
      • Now in Flesh Appearing Advent Devotional
      • Now in Flesh Appearing Advent Worship Liturgy Set
      • Advent Themes ⇨
        • Now in Flesh Appearing
        • God With Us
        • Do Not Be Afraid
        • In Light and Darkness
      • Family Devotionals
      • Coloring Posters
    • Curriculum
      • Mini Revolutions Curriculum (based on the RCL)
      • Compassion Camp (VBS)
      • The Beatitudes: An Illustrated Curriculum
      • The Lord’s Prayer: An Illustrated Curriculum
      • An Illustrated Invitation: Joining God at Work in the World
      • An Illustrated Compassion: Learning to Love Like God
      • An Illustrated Earth: Celebrating God’s Creation
    • Illustrated Worship Resources
      • Fall 2022
      • Summer 2022
      • Spring 2022
      • Winter 2021-2022
    • Lent
      • New for 2023
        An Illustrated Lent for Families: This is My Body
      • New for 2023
        This is My Body Lenten Devotional
      • New for 2023
        This is My Body Lenten Worship Liturgy Set
      • Lent Resources
      • Family Lenten Devotionals
      • Lenten Devotionals
      • Lent & Easter Worship Videos
      • Virtual Easter Pageant
      • Coloring Posters
    • Pentecost
      • Pentecost Coloring Page & Poster
      • Pentecost Coloring Page & Poster – Spanish-language Version
    • Coloring Pages & Posters
    • Illustrated Cards & Stickers
      • Greeting Cards
      • Stickers
      • 1.25″ Pinback Buttons
    • Spanish-Language Resources
  • Blog
    • Coloring Posters
    • Community Spotlight
    • Curriculum
    • Faith Formation
    • Family Ministry
    • Outreach & Mission
    • Product Updates
    • Reviews
    • Sunday School
    • Tutorials
    • Worship
  • FB Group
  • Contact Us
    • Frequently Asked Questions
    • Licensing Terms
    • Multi-Entity License Request Form
    • Submit Product Ideas
    • We’re Hiring!
  • SHOP
You are here: Home / Archives for Wooden Poster Hangers

Wooden Poster Hangers

Tutorial: How to Easily Create Wooden Poster Hangers to Display your Completed Coloring Posters

Adam Walker Cleaveland 2 Comments

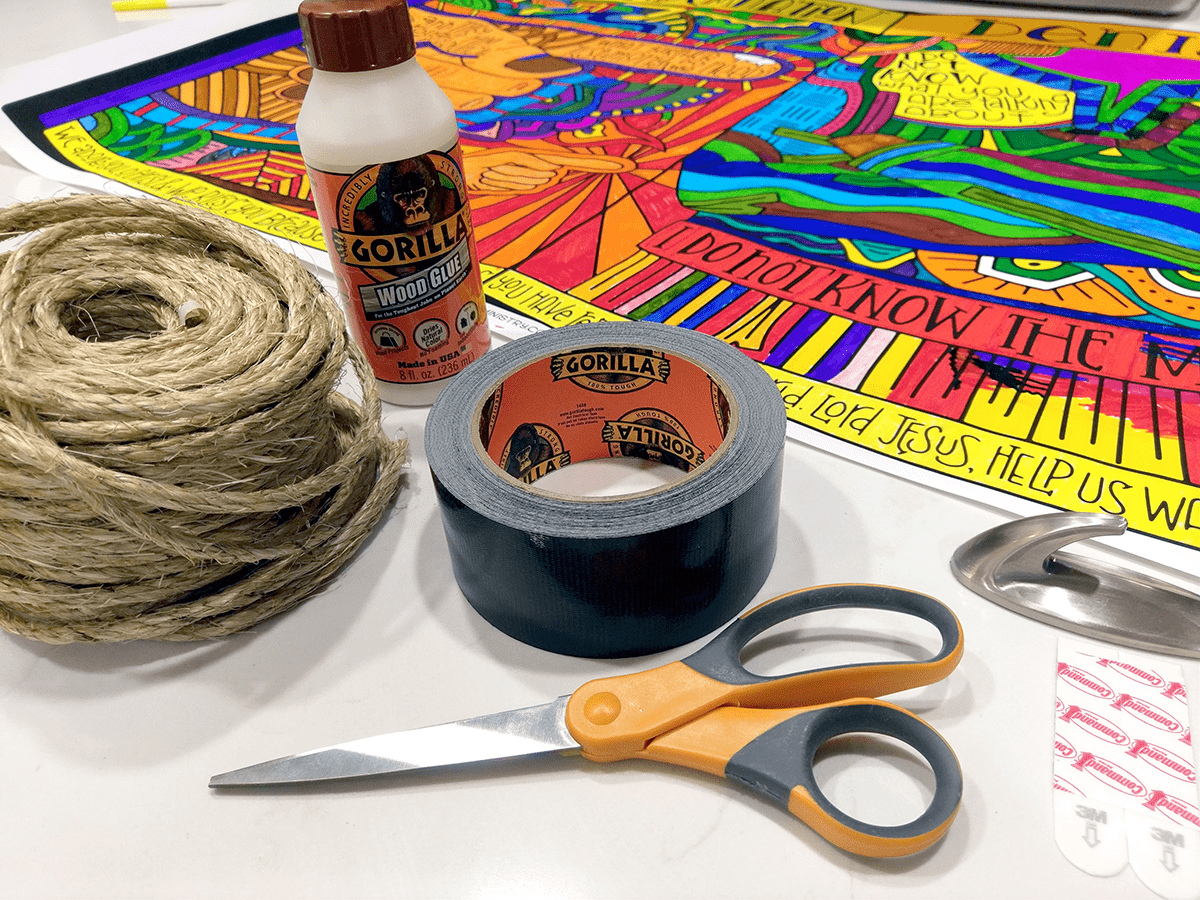
Are you wondering how you might hang and display your Stations of the Cross Coloring Posters? Or maybe another set of our coloring posters? Would you like to learn how to easily create these beautiful wooden poster hangers? The below tutorial will work for any of our coloring posters that are 36″ wide and 24″ tall, whether you ordered physical posters from us, or whether you got engineering prints made by Staples.

Illustrated Ministry community member Suzanne Voldman, a parishioner and volunteer at St. Timothy’s Episcopal Church in Yakima, Washington, first shared one of these photos in our Illustrated Ministry Facebook Group, and I was so impressed with the finished wooden poster hangers that I asked her if she’d be willing to share the process that she and her husband Kory came up with to create these. I think this is a beautiful example of a very budget-friendly way that you can display our coloring posters. Thanks Suzanne!

Hanging Engineering Prints

Have you been wondering how to display your Stations of the Cross Coloring Posters in an aesthetically pleasing, inexpensive and easily movable way? This was the challenge that perplexed me too! So, I headed to Pinterest which has become my favorite place to visit when I have a design challenge to solve. In no time at all I found many beautiful ways to display posters and there were several that looked very easy to replicate without much cost or effort. My husband, Kory, used the Pinterest examples, wood scraps and extra stain in our garage to create a set of beautiful wooden poster hangers for our Illustrated Children’s Ministry Stations of the Cross Coloring Posters. Let’s get started and we will show you how to make your own set of beautiful wooden poster hangers too!

Materials

  • Posters (36″ x 24″ Stations of the Cross Coloring Posters used in this tutorial)
  • Rope
  • Wood (1/4″ x 1 3/8″ x 42″ long – 4 needed)
  • 3M Command Strip Hangers
  • Gorilla Tape
  • Wood Glue
  • Paint or stain
  • Nails (7/16″ 18 gauge nails – if you plan to nail)

Tools

  • Saw (electric or hand saw) or consider getting wood pieces pre-cut at Hardware Store
  • Drill (to pre-drill holes)
  • Drill Bit (Use a drill bit just larger than diameter of rope)
  • Clamps
  • Scissors
  • 18 Gauge Nail gun and compressor (you can use wood glue and skip the nail gun)
  • Wire cutters or something to cut rope (scissors don’t work on the thick rope.)
  • Safety glasses (Be sure to wear when using tools)

Wooden Poster Hangers

Estimated Project Cost

  • Rope: $8 (this was for 100 feet of rope, you will use about 4 feet per poster.)
  • Hangers: $10
  • Tape: $8
  • Nails: $4
  • Paint or Stain: $7
  • Wood Glue: $5
  • Wood: $3 each (2 pieces @ 8-feet per poster (to make 4 pieces), total for 7 Stations of the Cross posters = 14 pieces). Approximately $42 for total of Stations of the Cross (you can use scrap pieces if you have them and cut them down to size to make this much more inexpensively)

If you buy all these materials for all of the posters it will cost approximately $12 per poster. However, you will have a lot of glue, rope, tape, paint and nails left over for another project. You could significantly cut the cost of this project if you have some of these on hand. We only had to buy the rope, the hangers and the tape. It cost approximately $26 for all 7 posters or less than $4 per poster.

Directions

STEP 1: Gather all your materials and tools. If you don’t have the tools to cut the materials yourself, you might consider getting the material cut at the lumber store or asking a friend with the proper tools to do it for you. These materials are very thin and could also be cut with a handsaw, if necessary. You will need to pre-paint or stain the wood pieces, so choose your paint or stain and make sure to follow the directions. We used extra stain that we had from another project and simply applied one thin layer. Lay these pieces out, paint or stain, and let them dry thoroughly. We used a “1/4 in. Natural Fiber Sisal Rope” that was purchased at the hardware store and is used for landscaping and gardening projects. You could use a different type of rope or cording.

Supplies Needed to Hang Engineering Prints

STEP 2: Cut pre-painted or stained wood pieces. Cut 4 pieces for each poster to 42″ long. This is based on a 3″ overhang on both sides of the 36″ poster. This was a preference for us. You can adjust as you see fit, but I wouldn’t have shorter than 1.5″ on either side.

STEP 3: Lay 2 boards together side by side. Place a mark 1.5″ on each end. Clamp boards together and drill a hole through the center at each end. Take your time and use your safety glasses. Set these pieces aside.

Making Wooden Poster Hangers

Making Wooden Poster Hangers

STEP 4: Cut 3 pieces of tape into 4″ lengths. Place the poster face up in front of you. Place 1 piece of tape, sticky side up, under the center of the poster leaving about 3/4″ of tape sticking out the bottom. Do the same with the other tape pieces near the outside edges. Take one of the bottom boards and mark each end at 3″ (these marks align to the edge of the poster). NOTE: Since the banners at the top and bottom of the Stations of the Cross posters are really near the edge, I used the banner borders to line up the board. Place the board on top of the poster aligned with the banner and 3″ marks and press into tape (tape will hold the poster to the board).

STEP 5: Flip poster over and place wood glue along the full length of the board. Place the second board on the top and nail to bottom board. NOTE: I nailed 2 nails every 6″ or so. You can also skip the nails and just use the glue. If you do, make sure to clamp and let it dry before you adhere the top and use a bit more glue.

Variation: We’ve had a few people who used screws OR bolts instead of glue to hold the pieces of wood together at the top and bottom. This way, they could loosen the screws and switch out the posters in the future. It can be a helpful alternative for folks looking to save money or who may not have endless amounts of wall space to hang the finished posters.

Hanging 36x24 Posters with Wooden Frame

STEP 6: Follow step 4 and 5 for the top of the poster. NOTE: Make sure to align the holes so the rope will go through.

STEP 7: Push one end of the rope through one of the holes and tie a knot. Figure out about how long you want the rope to be above the poster and cut with wire cutters (or whatever you can). Push cut end of rope through other hole and tie a knot. Cut off excess so both ends of the knots are about even. Keep in mind that if you are hanging these posters side by side you will probably want them to be the same length so that they are even when they hang. You may want to decide how long you want the rope, then cut and tie the next length of ropes the same lengths.

Displaying your 36x24 Posters

STEP 8: Let the whole thing dry for a few hours, then hang with a command strip or other hanger.

Wooden Poster Hangers

You did it! You have beautiful wooden poster hangers now!

We plan on hanging the posters in the Parish Hall at church. We hoped to display them by Holy Week, but perhaps these need to be hung now so that the whole church can enjoy them and they will inspire more participation in this wonderful, intergenerational collaborative art project and Lenten devotional. We hope you enjoying making these wooden poster hangers and displaying your beautiful Stations of the Cross Coloring Posters!

Hanging and Displaying 36x24 Posters


We want to again thank Suzanne and Kory for taking the time to document their process for creating these beautiful hangers for their Stations of the Cross Coloring Posters. If you are interested in framing them, here is another example of how someone framed and displayed them in their church hallway. What creative ways have you displayed your finished coloring posters?

Footer

  • Email
  • Facebook
  • Instagram
  • Phone
  • Pinterest
  • Twitter
  • YouTube

Copyright © 2023 Illustrated Ministry, LLC. All rights reserved. Licensing Terms.